
In this tutorial, you will learn how to make your voice sound clean, clear, and professional using Audacity, which is an audio freeware. This is a quick and easy guide to create professional sounding voice for your media, videos, podcasts, etc.
![]()
Do We Need Audio Equipment?
It’s true that sound quality will be better with sound equipment such as an external microphone like Blue Yeti or a Blue Snowball Ice and you will also have to buy accessories such as a microphone stand and a pop filter that will cost you hundreds of bucks. If you have these equipment, then recording it on Audacity and following this technique will improve sound quality dramatically. However, it doesn’t mean your recording won’t sound more professional and clearer if you don’t have any of the equipment that I described. Follow the steps below and your hear it for yourself.
How To Sound Like A Professional In Audacity
First off, you need to have a recording. Either you use a separate application like your system’s recorder to start recording or use Audacity itself to make your audio files. Find a place with as little as background noise where you can record and fire away!
Here’s a really crucial tip that everyone should follow when recording! Always start with at least 5 seconds of silence before you start speaking. The purpose of this will be explained in the next step.
General steps that we will follow to produce a high quality sound recording:
- Remove background noise
- Compress the audio
- Equalize the audio using the filter curve
- Normalize the audio
- You’re done!
1. Removing the background noise
- Remember the crucial tip that I told you? Here’s where it comes in. Highlight or click and drag the first few seconds of silence at the start of your recording.

- Next, head over to Effect>Noise Reduction…

- Noise Reduction window will pop up and you will have to press Get Noise Profile

- The window will automatically close. Now, highlight the entire recording (Ctrl+A for Windows, Cmd+A for macOS) and open Noise Reduction again.
- This time, click OK to apply the command and remove background noise.
2. Compressing the audio
- Select or highlight the entire audio file. Head over to Effect>Compressor

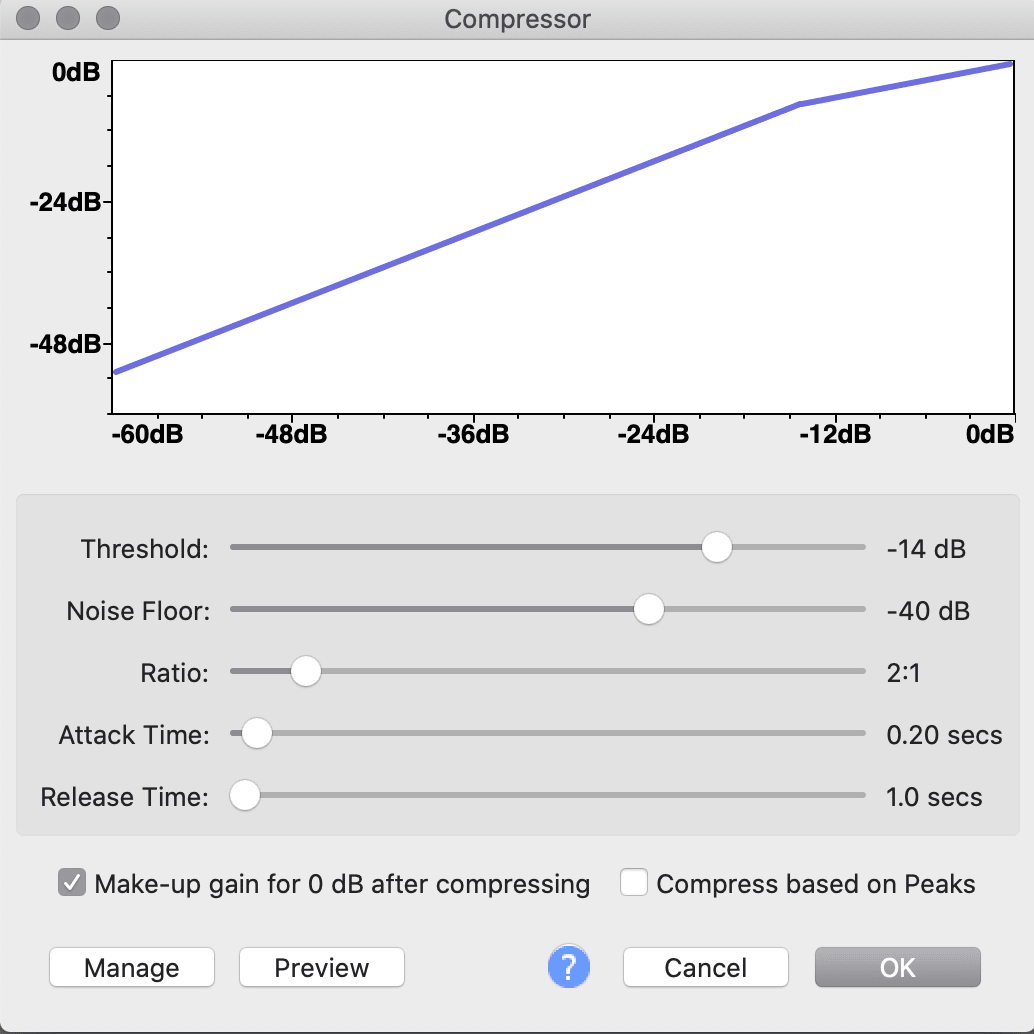
- These default settings are usually perfect already but let me show you an infographic made by Musician on a Mission explaining each setting for you:

- Click OK to apply compressor effect.
3. Equalizing the audio
- In this step, there are two ways that you can do. Firstly, either check whether you need a Bass Boost or a Treble Boost. It really depends on your voice quality and it’s best to experiment which will sound better for you. Secondly, you can use both the Bass Boost and the Treble boost (Check Step 5 if you want to do both)! Whichever that will make your voice sound clearer and more professional.
- Head over to Effects>Filter Curve>Manage>Factory Presets>Bass Boost and/or Treble Boost and press OK. Default settings are pretty fine. You can drag them up or down a bit and experiment which works for you best.

4. Normalizing the audio
- Using the Normalize effect sets your audio file at a certain overall volume that will get the maximum without changing its dynamic range.
- Head over to Effects>Normalize

- Normalize window will pop up and the default settings are usually perfect already. Click OK.

5. You’re Done!!
- You can repeat steps three and four if you need to use both Bass Boost and Treble Boost. You have to remember that you have to normalize (Step 4) the recording every after you apply a filter curve.
- Once you’re done, cut and clean all the unnecessary silence at the first part of your recording.
- You’re ready to save it! Head over to File>Export>Export as MP3

A Bonus Trick!
If you have a lot of recordings that you have to improve, there is a shortcut that will automatically do all the commands and effects that you need. Click this to read more about it.
You need to be a part of a contest for one of the best blogs on the net. I will highly recommend this blog!